


Getting dressed and undressed everyday should not be a daunting task. Luckily there are many tools and adaptive strategies that can help make it easier for you to dress independently. I will break it down by clothing type. You can read through or click below to jump to a particular section.
- Upper body dressing (shirts, overhead dresses, bras)
- Pants and underpants
- Socks
- Compression stockings
- Shoes
- List of adaptive clothing vendors
***********************************
Upper body dressing
Button up shirts. One of the biggest difficulties people have with putting on a shirt is fastening the buttons. Of course, one easy solution is to wear only pullover type tops and avoid buttons altogether. However, this might not fit with your personal style preference and there are times when a button up shirt is the only way to go.
One trick is to fasten all but the top two or three buttons before you ever put the shirt on. It is so much easier to see what you are doing when you are not trying to peer down at your own chest! If you don’t need to iron the shirt, you can even keep these lower buttons fastened all the time. Zippered tops can be treated in the same fashion, if you don’t unzip it all the way, you’ll save yourself a lot of grief getting the zipper started again.
Alternatively, if you or someone you know can do a little sewing, you can replace the buttons with hook and loop closure material while disguising it to look like a regular button up shirt. You would need to remove all the buttons, sew up the button holes and reapply the buttons over the closed up button holes (this is the disguise). Then attach the hook and loop closure material behind the button holes and on the matching side of the shirt. It takes some doing, but once it is done you can wear your favorite button up shirts without ever having to fasten a button. There are also companies that sell ready made or custom adaptive clothing. See list of vendors at bottom of this page.
Button hooks have been used for centuries to fasten tricky buttons. Modern button hooks have a narrow loop of metal on one end, a hook for grabbing zipper pulls on the other and an easy grip handle in the middle. I recommend trying them out if you can’t grip small buttons and zipper pulls or if you are dressing using only one arm. To use a button hook for buttons you first insert the narrow loop through the button hole. If it is the left side of your shirt that has the button holes then it is best to use your left hand to hold the tool. Insert the loop through the hole and catch the button in the loop. Use your right hand to stabilize the fabric around the button hole and use the tool to pull the button through the hole. If you are doing this one handed you may need to work out a more intricate dance to make it work based on which hand you are using and which side the buttons are on but, with a little practice, you’ll get it done. Remember that using any new tool takes practice so be patient with yourself.
If you have difficulty turning down/straightening your collar due to limited range of motion a few invisible stitches in the back of the collar will keep it down. Do consider whether you wear a tie with this shirt or if you want to be able to iron it a particular way before you add stitches. If passive range of motion is not painful, you can also use the edge of a table to help you reach the back of your collar. Sit in a chair pushed back a little bit from a table. Lean forward to place your elbows on the table, now lower your head and shoulders allowing your elbows to slide forward on the table. If you keep your elbows bent, this should bring the back of your head and neck into proximity with your hands.
Dresses. The advice here is pretty much the same as for shirts. If there are buttons, fasten as many as you can before you put it on, use a button hook if it helps. Dressing sticks and button hooks both have a hook at one end to use through a zipper pull. The short handled button hook is good if the issue is holding onto a small zipper pull. If your zipper is in the back, try turning the dress around so the zipper is in front, hooking a long handled dressing stick hook into the zipper pull, then turn the dress back around, put your arms through the sleeves and use the already attached dressing stick to zip it up.
A note on zippers. Whether we are talking about a dress, pants or jacket, any zipper can be made it a bit easier to use by adding a loop of string or fabric through the hole in the zipper pull to give you something more substantial to hold onto. Adding a loop will eliminate the need for pinch strength or grip because you can simply put a finger or thumb through the loop to pull.
A note on dressing sticks. Dressing sticks are typically a straight piece of wood with a small metal hook on one end (for zippers) and a plastic coated set of straight and angled extensions on the other. This non zipper end is used to extend your reach during dressing tasks. They can help you draw a shirt or jacket over your shoulder after getting the first arm in a sleeve. For pants (see more below) they can be used to hook a belt loop or to reach all the way down a pant or legging leg to help with threading your leg through and pulling up to where you can get a grip on the waist band.
Bras. Whether to wear a bra or not is a very personal decision. Some women are glad to chuck them while others feel vulnerable, exposed or undressed without one. If getting in and out of your bra is becoming difficult there are a variety of closures and strategies that might improve things. First of all, you don’t need to try to fasten it behind your back if you get front closure type bras (can be zippers or hooks). For a back closure model wrap the bra around below your breasts and fasten in the front where you can see what you’re doing. Then tug the fastened bra around to the front and put your arms through the straps before shifting everything for comfort.
Sports or nursing type bras often don’t have closures at all and can be donned overhead. Finally there are companies that specialize in making bras that are attractive and easy to put on and take off for customers with limitations in dexterity and range of motion. See the bottom of this page for a list of vendors of adaptive clothing.
***********************************
Pants and underpants
Some tips for putting on pants and underpants. First of all, since dressing can be tiring, thread your feet through underwear and pants while sitting, then stand up just once to draw them up over your hips. Use a reacher or dressing stick to thread your feet into your pants without having to bend over and reach your feet. Don’t struggle to pull the waist up when your feet are not all the way through the pant leg! First, gather the outside of the pant leg up and grasp all of the gathered fabric in the jaws of a reacher. This way you can wiggle your foot through to the ankle opening in one go, then easily lift the waist up to your knees or thighs.
Do your pants tend to drop to the floor as soon as you stand up before you can get the fly fastened? Here are a few things that can help.
- try rolling up the cuffs before you put the pants on, this will often keep the waist band up around your knees where you can still reach it while standing.
- add a piece of elastic fabric across the waist band at the fly. You should be able to pull them over your hips like elastic pants but you keep your regular style of pants and the fly will still work for using a urinal.
- loop an elastic band through the button hole and around the button to hold the fly loosely together while you stand to fasten the zipper.
***********************************
Socks
Many people find it difficult to reach their feet to put on socks and, following various surgeries, bending at the hip may be prohibited. Luckily, there are tools that, with a little practice, can make this task go smoothly. A sock aid, either rigid or soft is basically a trough with ropes attached. You pull your sock onto the trough then hold onto the ropes and place the trough on the floor in front of you. Insert your toes into the trough and pull on the ropes. The trough will slide up your foot, over your heel and up your calf bringing your sock with it. When you first put your sock on the trough, be sure to pull the toe all the way flush with the end of the trough.
To remove socks, you can use a long handled reacher, dressing stick or specialized tool like the Sock EEZ to push the sock down and off your foot.
***********************************
Compression stockings
Let’s face it, compression stockings are a pain in the rear to get on and off. Most standard sock aids will either slide out without donning the stocking or be squeezed too small to get your foot through. Some larger, more rigid sock aids can work but you may not be able to get your stocking onto the donner in the first place. I have no personal experience with the zippered stockings but I’ve had patients who swear by them. Please do send me a message if you have a favorite device for donning your compression stockings. Here are two techniques that I have used when assisting someone else don their stockings.
- As you may have discovered, you cannot pull a compression stocking on like it was a regular sock. Your foot will get stuck in the tight ankle part and you will likely wind up chucking the whole business. If you have any experience putting on pantyhose or tights, you know the technique of scrunching the leg up until you can get your toe in and then pulling up while letting the material slide out of your fingers. This techniques is a little better but will also likely lead to frustration and a half donned stocking. Instead, try the following.
- Turn the stocking inside out down to just past the heel leaving only the toe and mid foot part right side out and inside the leg of the stocking.
- Get the stocking started over your toes and the middle of your foot. Pull the bottom up to the edge of your heel.
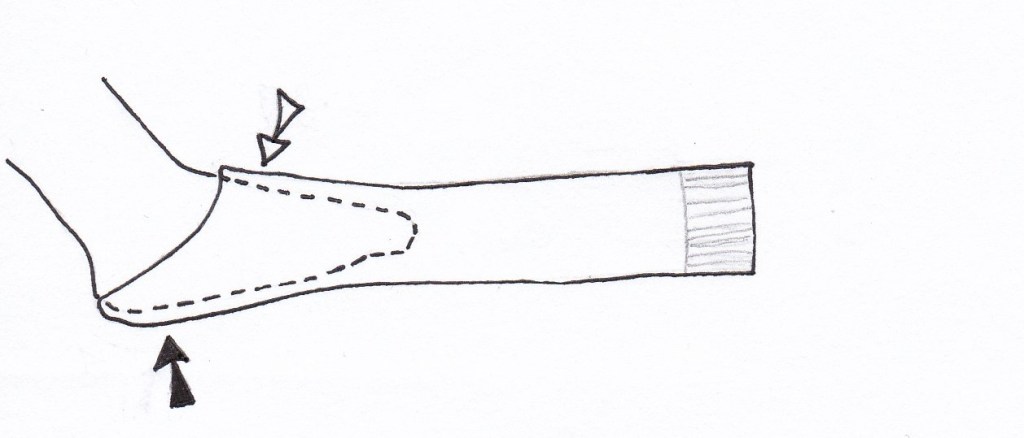
- Keeping the heel in place, grab hold of the loose material under your foot (the solid arrow in the above illustration) and pull it up and over your heel. Work just a little at a time pulling up material first from under your foot, then from the top of your foot (open arrow in illustration) until the stocking is in place up to your ankle. This is easier said than done! Be patient and keep working at it. It does get easier once you have the motions figured out.
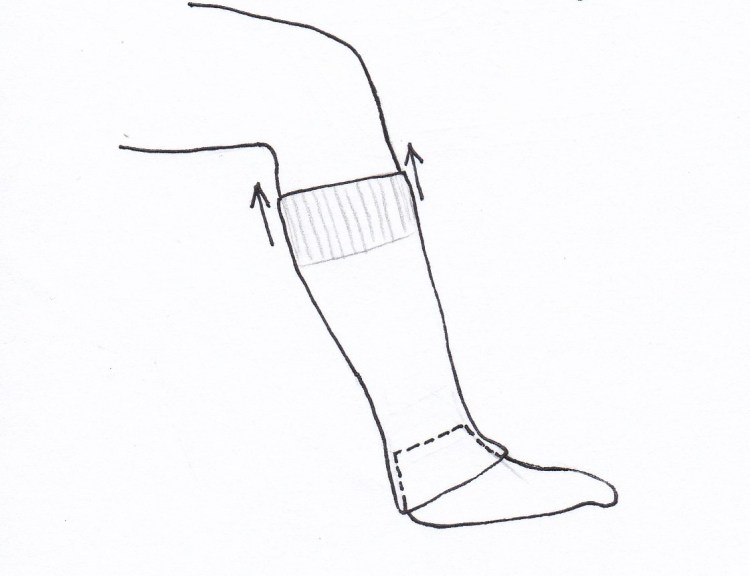
- Lastly, take hold of the cuff of the stocking turning it right side out as you slide it up to your ankle. You should now be able to pull the cuff all the way up. You may need to go back and smooth out any wrinkles that were left behind.
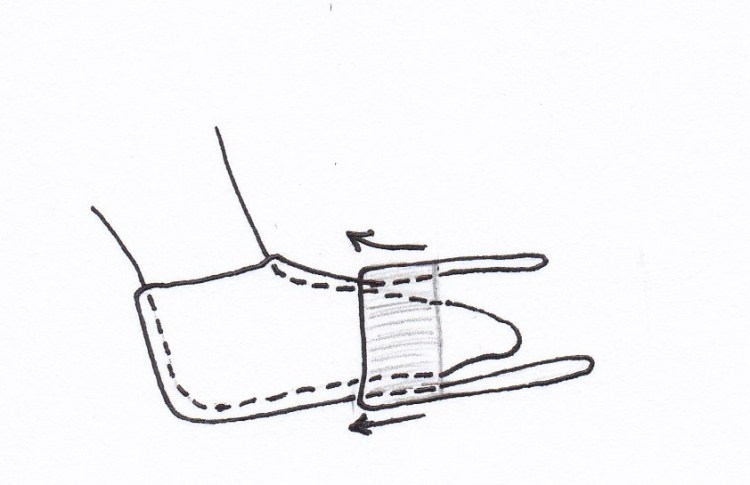
- The plastic bag method. This method works well with open toed stockings, I’ve used it with closed toe stockings but it is bit more of a wrestling match to extract the bag when you are done. The bag covers your heel and makes it easier for the stocking to slide over it.
- You’ll need a thin plastic bag, the sort you put produce in at the grocery store or a light weight small garbage bag is perfect. Place the end of the bag between your large and second toes then spread the rest of the bag under your foot and up to cover the back of your heel.
- Now the steps are the same as described and pictured above. Turn the stocking inside out down to just past the heel leaving only the toe and mid foot part right side out. Get the stocking started over your toes and snugged down over your foot. Working a section at a time, pull the stocking first over your heel and then work you way up the leg. Do not grab the cuff of the stocking until you have taken care of the heel and ankle. The stocking should slip more easily over your plastic coated heel.
- Last step is to pull the plastic bag out through the hole in the toe.
All of this assumes that you can reach your toes, have fairly strong grip strength and are determined to wear your compression stockings! Many people find that, while they can otherwise dress, toilet, and bathe themselves, they simply cannot don their own compression stockings. You can choose to avoid the whole wrestling match by having a helper don them for you. If you do, share these donning techniques with them. I can tell you it is tricky to do even when it is someone else’s feet you are working on! You may have a family member, friend or neighbor who can stop by in the morning and help you get your stockings on. If you have a caregiver who comes only a few hours a day, you may want to consider having them come in the morning to help don the stockings so you can get on with your day.
The good news is that getting a compression stocking off is easier, though it still takes some doing. I’ve found that peeling them off inside out works well. Alternatively, you can use a dressing stick to push the stocking down to your ankle then ease it over your heel. Some people find they can get the leg part of the stocking off, then stepping on that part with their other foot they can pull their foot out of the sock. The Sock EEZ mentioned above is also reported to be helpful in removing compression stockings.
***********************************
Putting on and taking off shoes
There are tools and adaptations that can take the struggle out of getting your shoes on and off. If reaching your feet is difficult when you are sitting on a chair, bring your foot closer to your hands by resting it on a footstool. Use whatever height works for you but 6-9 inches will probably be sufficient. Keep a chair and footstool by wherever you usually put on and take off shoes. Shoe horns are a tried and true tool that makes it easier to slide your heel into your shoe. Shoe horns come in various styles and lengths. Try a long handled shoe horn if bending over is a strain.
Many people find that tying shoes becomes difficult due to loss of fine motor control or discomfort with staying bent over for too long. If this is you, you have several options.
- You can transform your regular shoes into slip on shoes by replacing the standard shoelaces with elastic ones. You may need to fiddle with the tension but once you have it right, your shoes will be snug enough to wear and have enough stretch that you can slip your foot in without untying the laces every time. Elastic laces come in several styles. Traditional elastic laces look like regular laces but are stretchy. Spiral elastic laces are threaded through your shoes but not tied and the spiral keeps them from coming loose. There are bungee cord type laces that are adjustable or silicone straps that are stretchy but not adjustable. Search around a bit and you should be able to find something that fits your style and your needs.
- Alternatively, you can replace your lace up shoes with slip on shoes. Be sure that you are wearing real shoes, however, with a back that covers your heels and stays firmly in place. Scuffs and mules don’t provide enough support and can be a tripping hazard. Nothing worse than finding, halfway down the stairs, that your slippers are not coming with you!
- Use velcro type hook and loop fastening shoes. Not everyone loves the look but if your feet tend to swell over the day it is nice to be able to loosen your shoes! With a little practice you can fasten your shoes with a reacher and not have to bend over at all. There any many shoe companies making stylish shoes with hook and loop closures including Clarks, Pearl Izumi, TRAQ by Alegria, and Propet to name a few. Don’t give up if you don’t like the first ones you see and remember there are sandals and Mary Jane styles with hook and loop closures as well.
***********************************
List of adaptive clothing vendors
- Fresh Comfort – Women’s underclothing, bras, and underpants. www.freshcomfortinc.com
- Joe and Bella – wide selection of easy dressing alternatives. www.joeandbella.com
- Buck and Buck – wide selection of adaptive clothing for men and women. www.buckandbuck.com
- Silverts – wide selection of adaptive clothing for men and women. www.silverts.com
- IZ Adaptive – focus on style and fit for men and women. Lots of clothing specifically made with the wheel chair user in mind. Canada. www.izadaptive.com
- Magna Ready – lots of classically styled shirts and pants featuring magnetic closures for easy dressing. www.magnaready.com/
- Adaptations by Adrian – wide selection of adaptive clothing for men and women. Includes line of custom made shorts and pants for comfort and ease of dressing for wheel chair users. www.adaptationsbyadrian.com
- Able2Wear – adaptive clothing in the UK. www.able2wear.co.uk
