When I was working in sub acute rehab I would always hope to take my patient to the toilet during my initial evaluation because it is such a complicated task that it gave me a really good overview of a person’s abilities. So let’s break it down. You can read through it all or click on one of the subjects below to jump to that section.
- Getting into the bathroom and to the toilet
- Transferring to sit on the toilet, grab bars for toilets
- Commodes
- Managing clothing
- Tolerating sitting on the toilet seat
- Hygiene, anterior and posterior
- Hand hygiene
Getting into the bathroom and to the toilet
For some reason, bathroom doors are often narrower than other doors in the house. If you are new to using a wheelchair you may find that though it fits just fine through the front door and into your bedroom, you can’t fit it through the bathroom door. If the fit is close, you may be able to get an extra one and three quarters inch clearance by taking the door off the hinges. You can then hang a curtain for privacy. Alternatively you may consider changing the hinges to “swing clear” type that will move the door completely out of the door jamb when opened. The success of this depends on there being space for the door to swing all the way open. Depending on your door jamb and your handyman skills, you can get another inch of clearance by removing the innermost part of the door jamb, the door stop. Cut off the bottom 3 feet or so and reinstall it in the door jamb leaving the bottom clear as shown below.

providing extra 1/2 inch clearance on each side of doorway.
Be sure that the pathway from the door to the toilet is free of obstacles. Do not leave bathmats loose on the floor as they can catch on feet or walkers and be trip hazards. If you are using a walker, make sure that you keep it in front of you all the way until you are standing with your back to the toilet.
Transferring to sit on the toilet
Transferring with a front wheeled or 4 wheeled walker. The rule here is much the same as covered in my page on getting up. Back up until you feel the toilet against the backs of your legs. Then, if you are using a 4 wheeled walker, lock the brakes! You don’t want the walker wandering off without you, or rolling away as you lean on it! Next, you let go of the walker and hold on to an immovable object – grab bar, sink counter, or reach back for the toilet seat itself. Sit down slowly and with control.
Transferring from a wheelchair. For this, you really need to understand your own abilities. Can you comfortably stand and take a couple steps? Will a grab bar be enough to steady and support you or do you need another person there? Would you be better off transferring with a slideboard? Transferring to the toilet is something that you should have practiced with your OT or PT prior to being discharged home with a wheelchair. If, for some reason this was overlooked or you have acquired a wheelchair without going through therapy, here are some basic principles to think about. If you are having real difficulties with toilet transfers or any other mobility issues, please talk with your primary care physician. They will be able to provide you with a prescription for occupational therapy. A home health or out patient OT can help you figure out the best transfer method and practice it with you in safety.
- Consider the distance that your rear will need to travel from the chair to the toilet. Make this distance as short as possible. Generally, this means that the chair will be set up at an acute angle to the toilet. As shown below.
- Think about where your feet will be when you are ready to sit down and shift your feet toward that location before you stand up. This way you minimize stepping and shuffling when turning around.
- Remember that if you get started on a transfer and then realize something is wrong, it is generally better to sit back down and adjust rather than rushing through a poor set up and risking a fall.
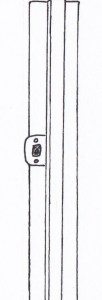
Grab bars for toilet transfers
I talked about grab bars in the tub/shower on the bathing page. They will also be vital for your safety and confidence with toileting. Install the grab bar horizontally. A length of 42 inches is recommended with the bar beginning no more than 12 inches from the wall behind the toilet. This places the bar so that it extends at least back to the middle of the toilet bowl (see diagram above) and leaves plenty of bar available to reach forward and pull yourself up to standing from the toilet. If your toilet is not next to a wall, you can install a free standing grab bar anchored at the wall and floor or a flip down bar that is anchored only in the wall.
Commodes
A bedside commode can be a great solution for several toileting issues. It eliminates the need to get to the toilet as the toilet can come to you. Some people will choose to use the toilet during the day but have a commode near their bed for middle of the night needs, thus reducing their risk of falling as they stumble to the bathroom while only half awake! Commodes can also be set up over the toilet to adjust the sitting height and/or provide armrests for improved comfort, balance and assistance for standing up.
Types and features of commodes. A standard commode can stand on its own or, with the bucket removed, can be placed over the toilet. A commode over toilet set up is great if your toilet is low and hard to stand up from as the height of the commode can be set at whatever is comfortable for you and the armrests are helpful to push down on. Commodes are rated standard (generally up to 350 pounds) and bariatric (max load 500-1000 pounds depending on manufacturer). Some bariatric commodes are designed with a platform seat, this style may be more comfortable for people of various sizes and shapes. If balance and/or fear of falling are an issue, you may feel more secure sitting on the platform. Platform commodes are larger and more expensive than other styles. All three types (standard, bariatric, and platform) are available with a drop arm feature. The ability to move the armrest out of the way is helpful for sliding or scooting type transfers when you are not able to fully stand and take steps. For those using a slideboard to transfer, the platform style of commode provides a broader surface for the slideboard to rest on. Non slip fabric (like shelf liners) placed under the far side of the board will also increase its stability.
When purchasing, be sure to note the shortest and tallest setting, then compare with the height of your toilet. When fitting the commode over your toilet be aware that you may want to raise the toilet seat (so the commode fits just over the porcelain rim) or remove the toilet seat altogether so that the commode can be pushed further back. Your commode may also come with a splash shield that directs urine into the toilet and prevents leaks.
Managing Clothing
Ok, so you’re able to get to and from the toilet but in order to do the business you came to do, you’ll need to get your clothing out of the way and then back on again when you are done. Belts, zippers, and buttons can all be done and undone while sitting, either on the toilet seat or in your wheelchair. One caution, if you wear loose pants and unfasten everything while sitting in the wheel chair, your pants may fall to your ankles as you stand and present a trip hazard as you step around to sit on the toilet. In this case it may be best to transfer to the toilet, unfasten everything while sitting on the toilet seat, then stand and let it drop.
Having a long handled reacher that lives near the toilet can be useful for pulling pants that have fallen down too far back into reach. Rolling your pant legs up to your knees before lowering your pants can also prevent them from falling all the way to the floor.
Keep in mind that it is always preferable to take a little longer and be safe. This might mean that when you get to the toilet you sit and catch your breath before standing up to manage your clothing and then sit back down. When you are done, pull up your clothing and sit back down to catch your breath! Get up and move to the sink only when you are fully ready to do so.
Tolerating sitting on the toilet
For some people, the act of sitting on the toilet is very uncomfortable based on baseline pain levels or being particularly thin or frail. If you struggle with this, there are some adaptations that can make it more tolerable. First, be sure that the height of the toilet seat is adjusted to your size. As mentioned above, an adjustable commode seat can be placed over the toilet or a raised toilet seat can be clamped onto the toilet rim. Padded toilet seats are available to use on a commode seat or toilet seat. They typically have straps that hold them in place and are made of a material that can be wiped clean. Smaller statured people may find that their toilet seat is too high and that their feet don’t reach the floor. This presents both safety and comfort concerns. A simple foot stool is a great solution and a folding foot stool can be easily stored next to the toilet and out of the way. The Squatty potty is a stool especially made for use around a toilet. Sitting on the toilet in a squatting position does make having a bowel movement much easier and eliminates straining. The Squatty potty is a good tool (I used one when I was pregnant) but it is large and may be in the way if some toilet users stand to urinate facing the toilet. I’ve found that a folding stool works just as well. Be sure that whatever stool you use is out of the way of your feet before you stand up.
Hygiene anterior and posterior
Moving right along we come to perineal hygiene, pericare, or just plain old wiping. There are many terms to describe it but it is all the same thing and can be a challenge based on poor balance or range of motion limiting your ability to reach where you need to. Having a grab bar or solid counter to hang onto with one hand can be important for leaning forward or to the side to complete hygiene. If reach is difficult for you due to arm range of motion, hip pain, or basic anatomy (short arms, wide hips, etc) there are toilet aids that might be very helpful. There are various designs from tongs to wands, straight to curved, and long to short. The premise is all the same, the device holds the toilet paper or wipe and extends your reach. After using, the paper is then dropped into the toilet or a garbage bag for disposal. The toilet aids are all simple to use though it may feel awkward at first. They do offer independence for personal self care and are commonly beloved by those who use them.
Just as with bathing and any other activity, be sure that everything you need is within reach, stays within reach and that you have a reacher handy to pick clothing or paper up off the floor if needed.
A side note here. It is very important for women to wipe from front to back only. This is to prevent urinary tract infections (UTI) which are a serious problem with symptoms including dementia-like confusion and cognitive declines which may lead to falls and injury.
Hand Hygiene
After finishing with toilet hygiene and getting clothes back on and adjusted many people try to sprint to the sink for a quick rinse of the hands before getting on with the day. My advise is to slow down. If standing and walking are tiring, then toileting will be a workout. After you have your clothes back on, sit down on the toilet seat to catch your breath before you walk to the sink or transfer back to your wheelchair.
If you have room, place a chair in front of the sink and wash your hands while seated. Keep the hand towel right next to the sink. Do not walk across the bathroom with dripping hands! Water on the floor is a real slipping hazard so mop up any spills with a towel and reacher.
